
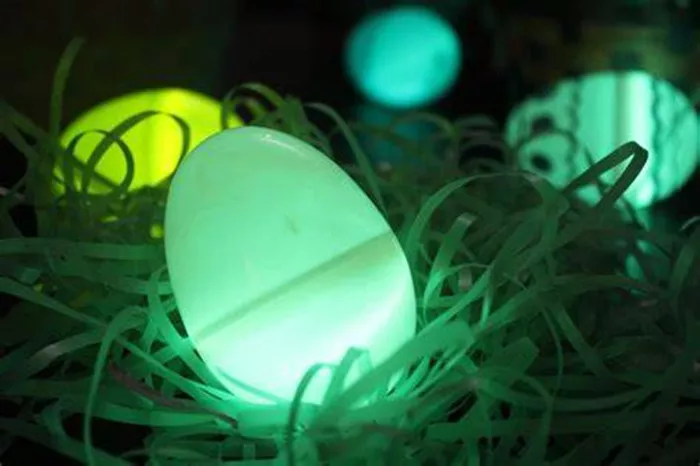
Glow-in-the-dark Easter eggs add an exciting twist to the traditional Easter egg hunt. Whether you’re preparing for an evening hunt or just want to create something visually captivating, glow-in-the-dark eggs bring an extra layer of magic to your Easter celebrations. These unique eggs aren’t only fun for kids, but they also make a fun activity for the whole family. In this detailed guide, we will walk you through everything you need to know to create your very own glowing Easter eggs, from the materials to the techniques that ensure they shine bright through the night.
Why Make Glow-in-the-Dark Easter Eggs?
Traditional Easter egg hunts are a beloved part of many people’s childhood memories. However, creating glow-in-the-dark eggs transforms this familiar tradition into something even more exciting. These glowing eggs are perfect for an Easter evening hunt, which can be a magical experience. Plus, glow-in-the-dark Easter eggs can be a great craft project for children, allowing them to use their creativity while also getting a hands-on science lesson about phosphorescence (the glow you see after a material absorbs light).
Adding glow-in-the-dark elements to your Easter eggs can also create memorable photos, making your Easter festivities look more enchanting than ever. Furthermore, it offers the opportunity to explore different art techniques, experiment with colors, and use various materials.
Materials Needed for Glow-in-the-Dark Easter Eggs
To begin, you’ll need a few essential supplies. Luckily, most of the items required are easy to find and fairly affordable. Here’s what you’ll need:
1. Glow-in-the-Dark Paint or Powder
The star of the show is, of course, the glow-in-the-dark medium. There are two common options:
Glow-in-the-dark paint: It’s easy to use and can be applied directly onto eggshells. It’s a good choice if you want vibrant colors and a smooth finish.
Glow powder: This is typically mixed with a clear medium, such as a craft glue or clear nail polish, before application. It’s often used for a more textured look and can be sprinkled onto eggs for an interesting finish.
2. Plastic or Real Eggs
You can either use real eggs or plastic eggs. Real eggs will require extra steps for preparation (such as boiling and emptying them), but they provide a more authentic feel. Plastic eggs are quicker and easier to work with, especially if you’re planning to hide them in grass or bushes for the hunt.
3. Paintbrushes or Sponges
To apply the paint or glow powder, you’ll need brushes or sponges. Sponges are great for covering larger surfaces with an even layer, while paintbrushes are better for adding details or intricate designs.
4. Clear Glue or Clear Nail Polish (for Glow Powder)
If you’re using glow powder, it will need to be mixed with a clear medium to adhere to the eggs. Clear glue works well for a sticky, transparent finish, while clear nail polish can be an alternative, providing a hard, glossy surface.
5. Plastic Cups or Containers
If you’re using glow powder, a small plastic cup or container is useful for mixing the powder with your clear medium. You’ll also need a separate container if you plan to dip the eggs into a glow mixture.
6. Optional: Glitter, Stickers, or Decorative Items
To add a creative touch, consider using additional items like glitter, stickers, or even washi tape. These decorations will give your glow-in-the-dark Easter eggs a more personalized look.
7. UV Light Source (Optional)
While glow-in-the-dark items naturally glow when exposed to light, using a UV flashlight or blacklight can enhance the glow, especially if you plan to display them in low-light environments.
Step-by-Step Guide to Making Glow-in-the-Dark Easter Eggs
Now that you have all your materials, let’s dive into the step-by-step process to create your glow-in-the-dark Easter eggs.
Step 1: Prepare Your Eggs
The first step depends on whether you are using real or plastic eggs. Here’s how to prepare both types:
Real Eggs:
Boil the Eggs: Boil the eggs to harden them, which will make them easier to paint. A 10-minute boil is typically sufficient.
Empty the Eggs: If you want to empty the eggs to make them hollow, gently pierce each end with a pin and blow through one end to release the egg whites and yolks. Be careful not to crack the shell.
Dry the Shells: Once the eggs are empty, wash the shells thoroughly to remove any remaining residue. Allow them to dry completely.
Plastic Eggs:
Simply purchase plastic eggs in a size that suits your design. These can be found at craft stores or online and are available in a variety of colors, sizes, and finishes. You don’t need to do anything extra to prepare them.
Step 2: Apply the Glow-in-the-Dark Paint or Powder
Now it’s time to give your eggs their glowing power. You can either use glow-in-the-dark paint or glow powder for this step.
Using Glow-in-the-Dark Paint:
Apply a Base Coat: Using a paintbrush or sponge, apply an even layer of glow-in-the-dark paint to the surface of the egg. Be sure to cover all the areas, as any unpainted spots will not glow.
Let It Dry: Allow the first coat to dry completely before applying a second coat. This will ensure that the glow lasts longer and is more vibrant.
Apply Additional Coats if Necessary: If you’re using a paint with less glowing power, you may need to apply multiple coats to ensure the best result.
Using Glow Powder:
Mix the Glow Powder: In a small plastic cup, mix the glow powder with a clear medium, such as glue or nail polish. You’ll want to follow the instructions on the packaging to get the right ratio.
Apply the Glow Mixture: Use a brush or sponge to apply the glow powder mixture onto the egg’s surface. Be sure to cover the egg evenly for a consistent glow.
Dry the Egg: Allow the glow powder to dry completely. This may take longer than paint, depending on the medium you’re using.
Step 3: Decorate Your Eggs (Optional)
Once the glow-in-the-dark layer is applied and dry, you can take the creativity up a notch by decorating the eggs.
Add Glitter: While the glow paint is still wet, you can sprinkle glitter over the eggs to give them a sparkling effect. The glow paint will hold the glitter in place, creating a shimmery, eye-catching surface.
Use Stickers or Washi Tape: Add fun designs using glow-in-the-dark stickers or washi tape. This can help create intricate patterns or add personalized designs to each egg.
Create Custom Patterns: If you want to add a little more flair, you can use painter’s tape to mask off parts of the egg, creating geometric patterns or stripes when you paint over them.
Step 4: Activate the Glow
The key to seeing your glow-in-the-dark Easter eggs come to life is exposing them to light. After the paint or powder has dried completely, place the eggs under a bright light source for a few minutes. The UV rays will energize the glowing particles, charging them up and making them glow in the dark.
If you want to create an even more striking effect, consider using a blacklight or UV flashlight. This will amplify the glow, making your eggs stand out even more in low-light or dark environments.
Step 5: Hide the Glow-in-the-Dark Eggs
Now that your eggs are glowing, it’s time to hide them for the Easter egg hunt! If you’re doing the hunt in the evening, make sure to hide the eggs in areas where the glow will be visible but still hidden enough for the kids to find them.
Conclusion
Glow-in-the-dark Easter eggs are a fun and unique twist on a classic tradition. With a few simple materials and a bit of creativity, you can make an Easter egg hunt that will light up the night. Not only will you create stunning, glowing eggs, but you’ll also introduce an element of fun and mystery that everyone will enjoy. So, gather your supplies, and get ready to create glowing Easter eggs that will shine brightly and make lasting memories for years to come!
Related topics: